one of old applications for message compliance is Enterprise Vault (EV).
In this article (and future posts) I will try to show real-life scenario for the EV.
in this article I will explain how to install EV in windows cluster.
prerequisites:
– You have a working AD and exchange server in your environment.
– you have access to your AD and Exchange server (as an administrator)
– you have at least two nodes (fully patched) for windows cluster installation and EV service account must be a member of Administrators group
– my cluster nodes have two local disk, C and D.I will install the EV on drive D.
– you have a centralized storage (SAN,NAS, software NAS) to share storage between two nodes in cluster.
-you have a node (fully patched) with SQL express installed on top of it.
-You will need an account to be used as Service account in EV
-you will need EV license (.slf) file.you can request a demo license from Veritas or your local Representer.
SQL:
I will not go in details on how to install SQL even though it is a straight forward process.I have installed SQL Express 2016 for on MY SQL node with two partition (D,E) for hosting DBs and LOGs.
On SQL Node ,We need to provide permissions to our service account in the SQL server: (below is qouted from Veritas web site)
- Start SQL Server Management Studio.
- In the tree, select Security>Logins.
- Right-click Logins, and select New Login.
- Either type in the Vault Service account as domain\username or click Search and search for the account. In the search dialog box, ensure that the correct domain is entered in the Locations box.
- Select Windows authentication.
- In the tree, click Server roles.
- Select the check box beside dbcreator.
- Click OK.
- In the toolbar, click New Query.
- Enter the following script:use Master GRANT VIEW SERVER STATE TO “domain\vsa_account” GRANT ALTER ANY LOGIN TO “domain\vsa_account” GRANT VIEW ANY DEFINITION TO “domain\vsa_account” GOwhere domain\vsa_account is the domain and name of the Vault Service account.
- Click Execute.
- You can check that the Vault Service account has the dbcreator role as follows:
- In the tree, select Security > Server Roles.
- In the right-hand pane, double-click the dbcreator role.
- The Vault Service account should be displayed in the membership list.
- You can check that the Vault Service account has the correct permissions as follows:
- In the tree, right-click the top level SQL Server object and select Properties.
- Select the Permissions page.
- Under Logins or roles, select the Vault Service account and then click Effective Permissions. Check that VIEW SERVER STATE, ALTER ANY LOGIN, and VIEW ANY DEFINITION are included in the list of permissions.
- Unless you assign the SQL system administrator (sysadmin) role to the Vault Service account, you must perform the following additional steps before you run the Enterprise Vault Configuration wizard for the first time:
- Add the Vault Service account to the msdb system database.
- Grant the Vault Service account Select permissions on the msdb tables sysjobs, sysjobschedules, sysjobservers, and sysjobsteps.
- Assign the database role SQLAgentUserRole to the Vault Service account.
- Open SQL server configuration manager>SQL Server Network Configuration>Protocols for <instance Nname>Confirm Named Pipes and TCP/IP are enabled under status.
- if you have any firewall in between EV And SQL server,port 1433 TCP (or your custom port) must be accessible by EV.
Windows Cluster:
To install Windows cluster, make sure both of your windows are up to date.I have created my cluster on top of Nutanix.created five disks in a volume group and attached them to my two cluster nodes.
disks are used for :Index,Storage queue and message queue, Shopping, Vault, cluster quorum
1. on each node we need to install the windows cluster feature
2. You should have at least two network card on each node , one for cluster replication, one for cluster heartbeat. for my LAB I have used only one Network card on each node
3.open the Windows cluster manager and select create cluster wizard and add both of new nodes to the cluster.
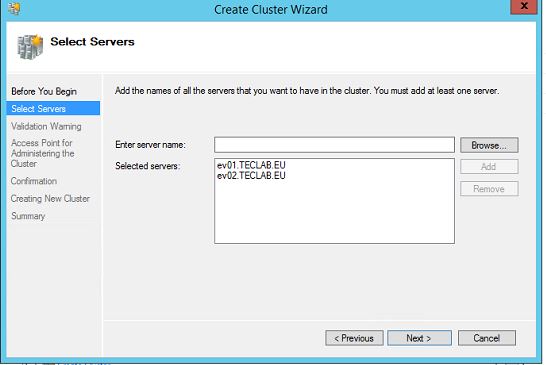
do the Cluster validation and remediate all errors(if any)>create an access point name and IP for cluster.As a best practice, add the cluster computer account and computer account for nodes in one OU in AD and provide create object to the cluster account,otherwise you will face an error (if you are not logged in by Domain admin to the computer,I have logged in by service account “evadmin”
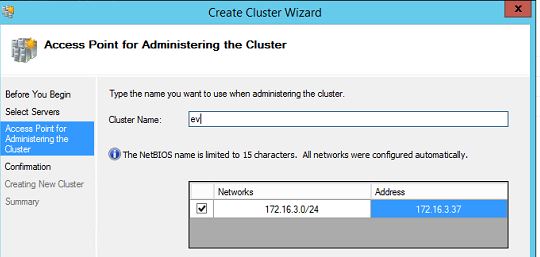
I have selected evsite as cluster name and provided the shown IP Address to it,click config and create cluster.
once the cluster is created, add the quorum disk to cluster and then configure the cluster quorum disk.
add other disk storages to the cluster but do not add them as shared cluster storage.I recommend you rename each disk to what it
will be hosting and make sure, the provided drive letter is not occupied on second node
now we have our cluster ready,do the failover between your cluster nodes to confirm there is no issue in your cluster.
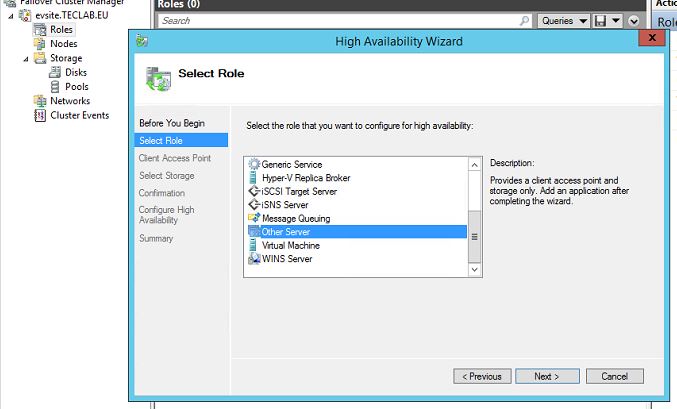
next step is to to create a role in our cluster,
let’s create the role for EV:
under cluster name , right click on role and create new role>from select role, create other server>
provide a client Access point and IP address for the role
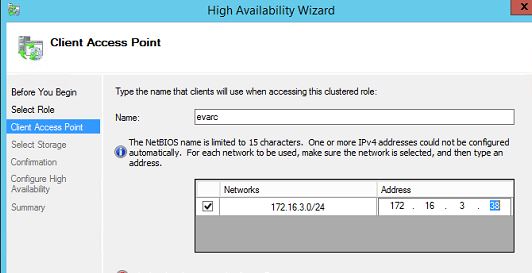
click on next and add disk storage’s which was added to cluster in the earlier step. click next and confirm and create the role.
our role is ready for EV but before we can actually install the EV on the cluster we need to do one more step.EV requires high available message queue to be available on the role which is going to host it, so we need to add the message queue.
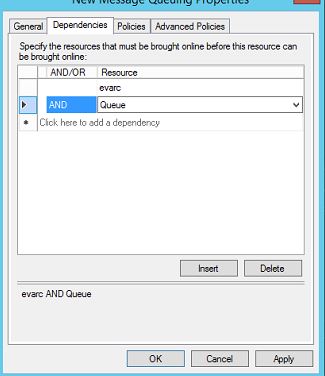
message queue has tow dependencies, a client access point name (we will use the one created earlier)and a disk storage (we have added earlier).
right click on newly created role>add resource>more resources>Message Queue
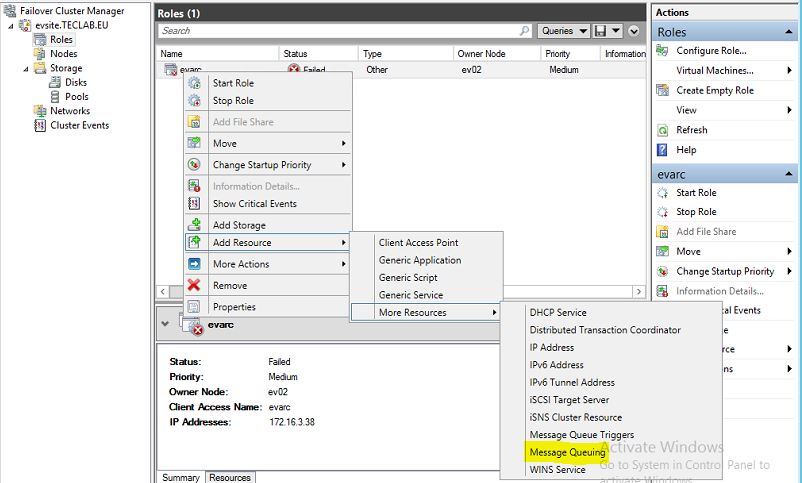
now on the dependencies tab, add the access point name and the disk which is designated for message queue
Congratulations, our cluster is now ready to host EV!
EV INSTALLATION
We will install the EV binary (application) and configuration on one node and when everything is finish, we will install the EV binary on second node.
on primary node mount the EV installation ISO and open the installer application>server preparation,Prepare my system
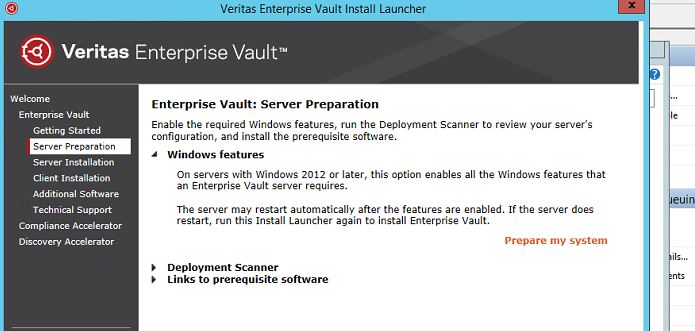
it will show you all required packages and will install them automatically for you and might restart the node for you
once the preparation is done, from installer>server installation>install>next>select run deployment scanner> add your exchange and sql name in the scanner, and go through provided report.if there is any error , you must fix before going further,for warning, you need to check and take action if required.
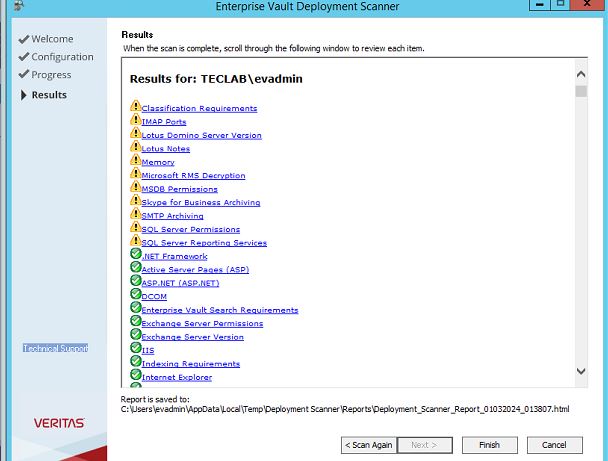
for me there was one warning related to SQL server permissions, which I fixed it (SQL preparation part).all other warning for my setup can be ignored.click finish and continue with installation
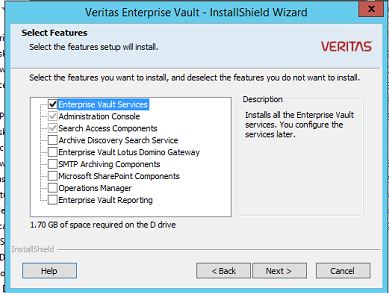
click next, and choose the location for EV setup on node.I selected drive D for EV installation, click next and select which EV component you want to install,I have selected Enterprise Vault services.In case you need other components, you can add them (you might need to do more preparation as well)
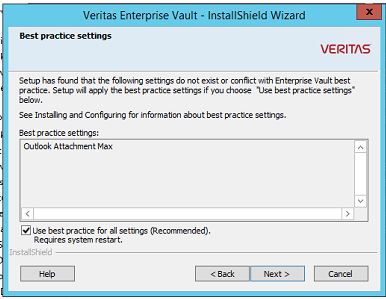
click next on the report summary click next ,on best practice settings, EV will make sure that best practice settings are applied and if there is any missing configuration it will ask present to you, click the check mark and click next
you will be asked for veritas EV license (slf fie) which you need to present to setup.click next
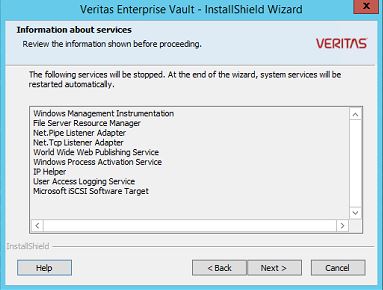
you will receive information about services which will be stopped during installation:
click Next and installation will proceed.once the installation is finished successfully,We have finished the installation of Binaries.
repeat the same steps on second node(s).
EV configuration
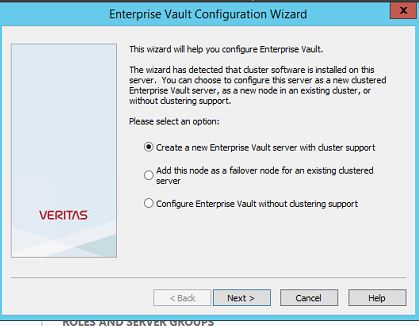
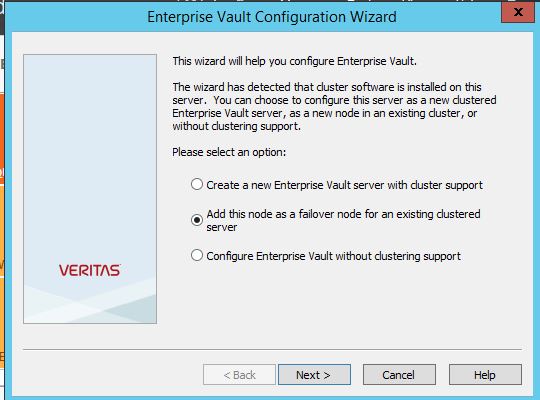
in the primary node, find the Enterprise Vault configuration Wizard and start it, (make sure , you are logged in be EV service account.
select, Create a new Enterprise Vault sever with cluster support. and click next
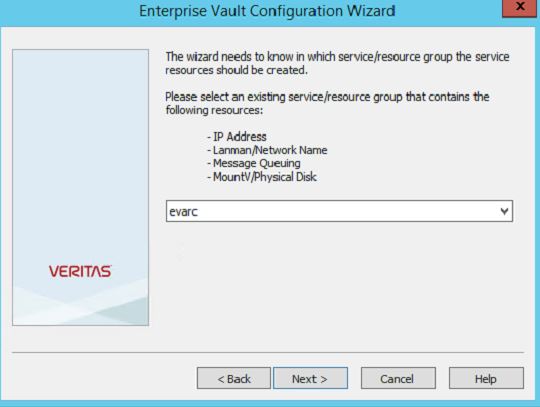
provide the role name , which we have created on our cluster and click next
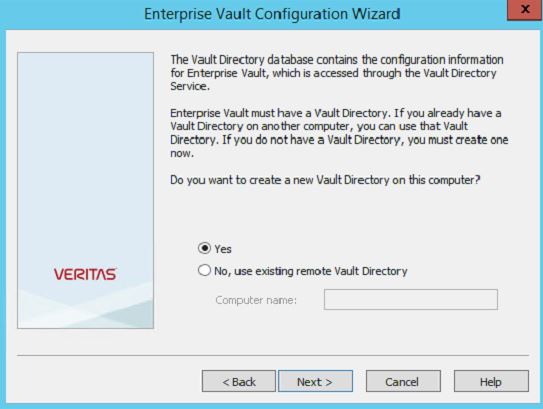
On next page , select yes and click next
on next windows, select the language,English, and click next
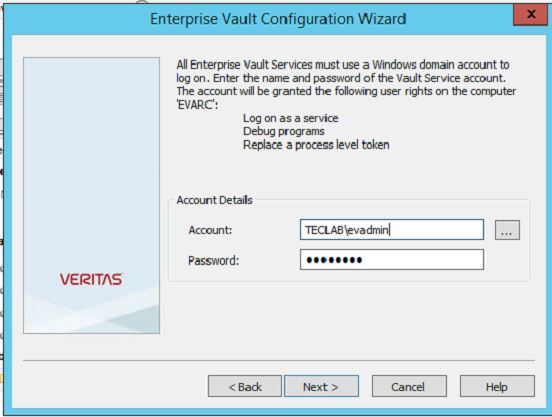
provide the details for EV service account and click next
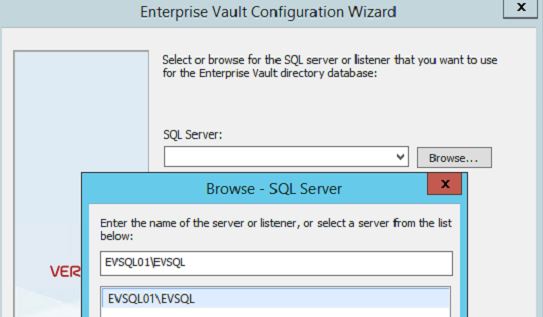
select the SQL server which we have prepared earlier,if the name is not showing , or you faced an error, it means , you have not done the SQL preparation correctly which you need to fix it before proceeding further.click next
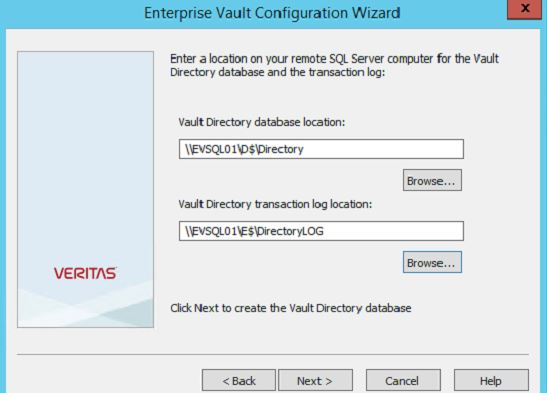
We need to provide the location for Vault directory database and transaction log,click next
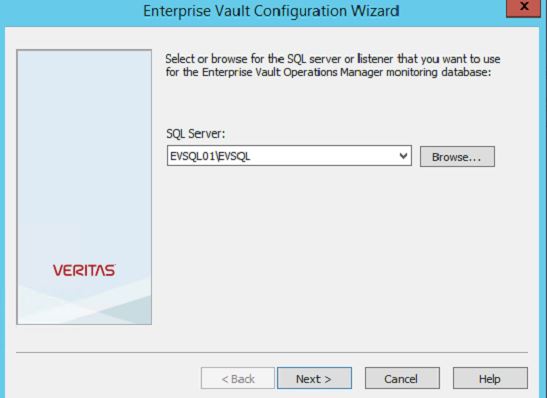
provide location for EV Operations manager monitoring Database, click next
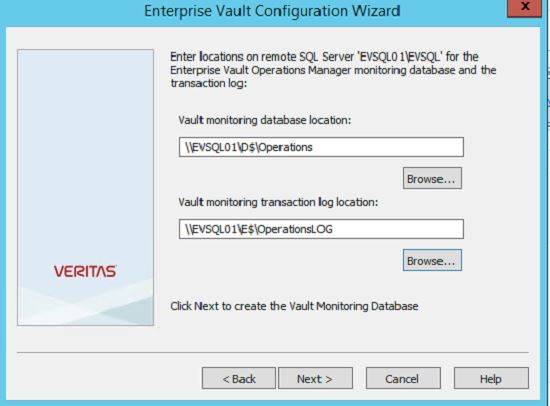
provide location for Vault monitoring database and transaction log and click on next
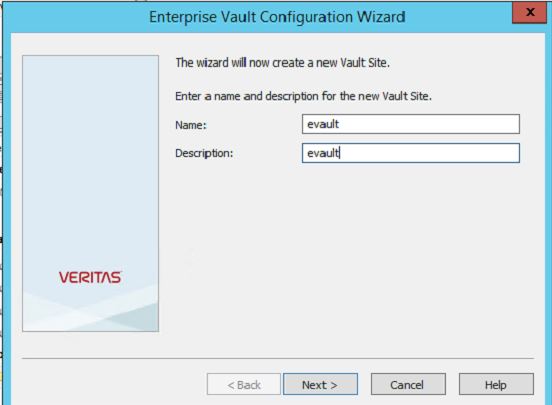
provide a name for the site which will be created and click on next
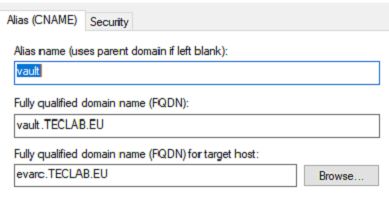
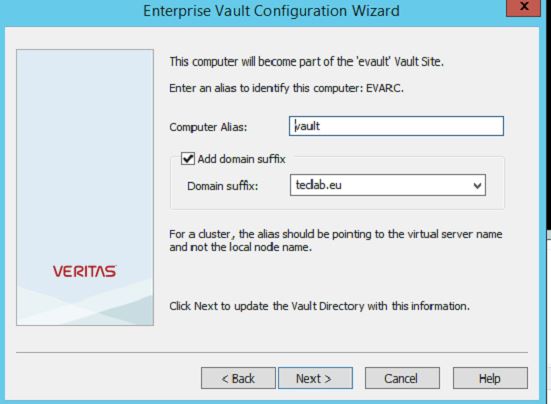
you will be asked to enter an alias name , you need to create an alias name in your DNS and point it to your cluster role access point name.
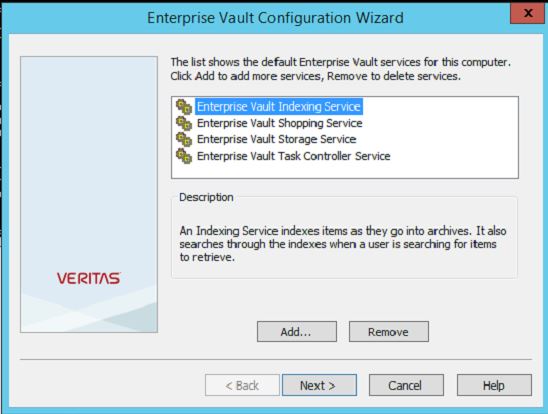
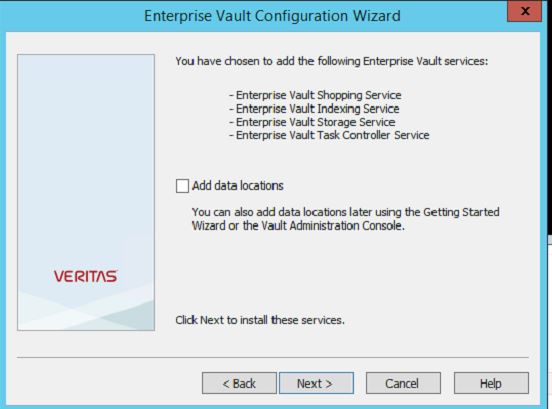
on next page, you will see all services which will be added to your cluster.click next
on next window, you can click next, or select the “add data locations”,i have selected the add data locations.click next
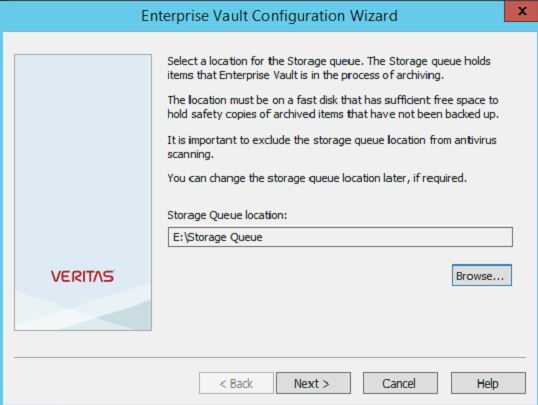
on storage Queue location, select the disk which you have designated for it from the browse and click next
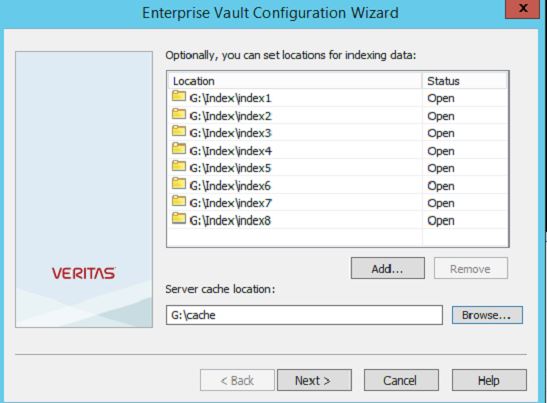
on the next page, add the storage for EV index and the server cache as well.(if you are doing for the production, it is crucial for the underlying storage to be a fast one (NVME, SSD).click next,(you might receive an error, regarding failed to start the cacheDeletion thead on EVARC, which you can ignore due to fact admin service is not started yet.
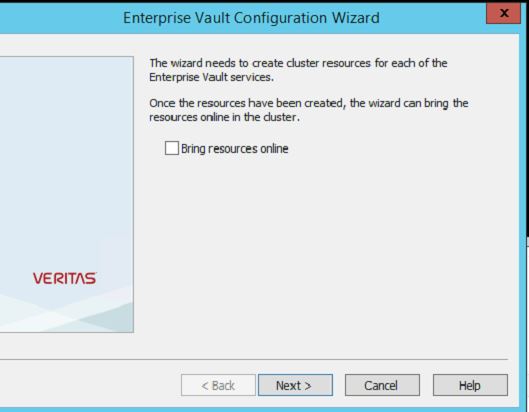
on next window , you will be asked if you like to bring the resources online, click next, without the check mark
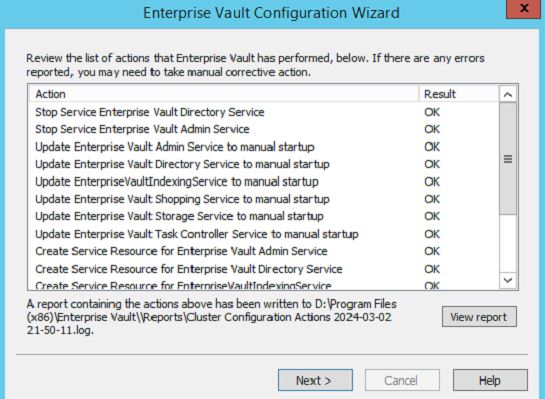
on next windows, confirm there is no error and clock next
on the next window, select just close this wizard and click on finish.
now lets open the windows cluster and check all services which been added to our role
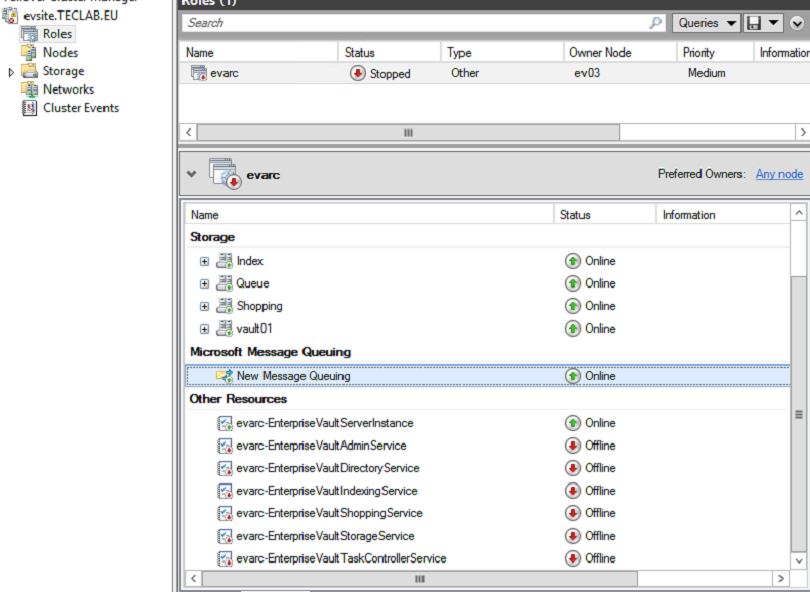
bring all resources up, starting by EVAdmin, Directory service, Storage, shopping, Indexing.
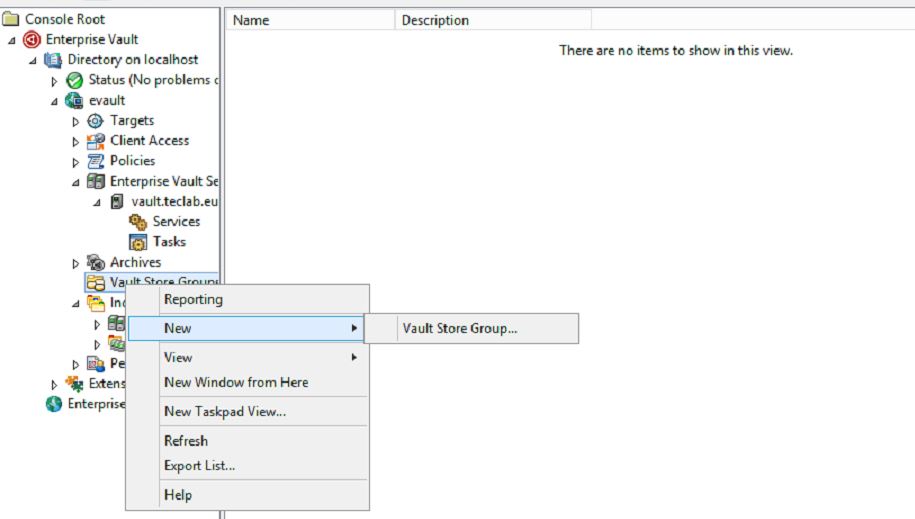
open the Enteprise vault console and from left side, expand menu till vault store group, right click on it >new >vault store group
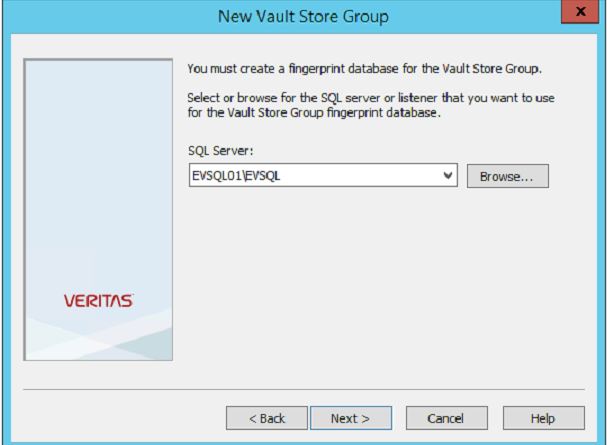
enter a name for your vault store group, and click next

select the SQL server and click next
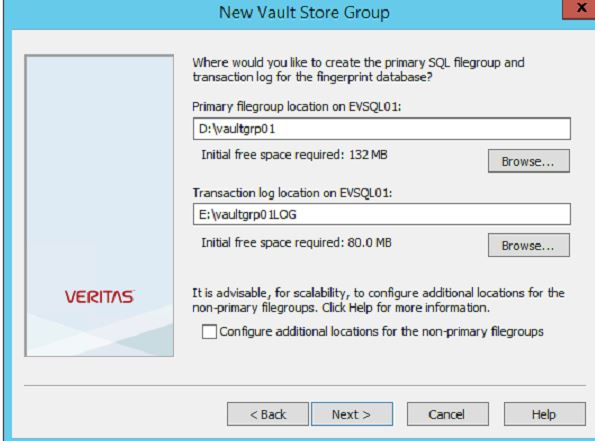
select location for primary sql filegroup and transaction log for the fingerprint database and click on next(if you like you can add for non-primary file group which I am not going to configure)
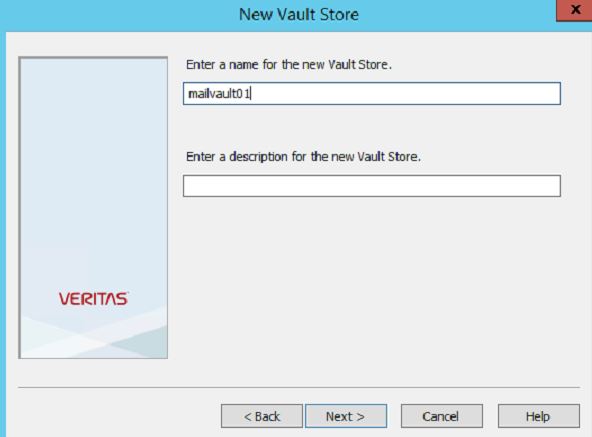
click next and , you will asked to enter vault store ,enter the vault store name and click next
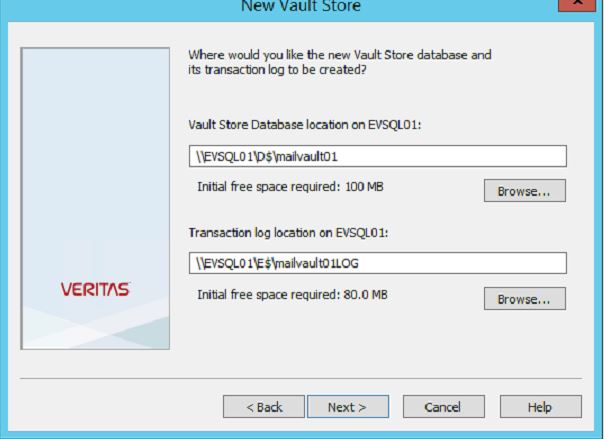
click next , select the SQL server and click next,select the location for vault store database and transaction log and click on next
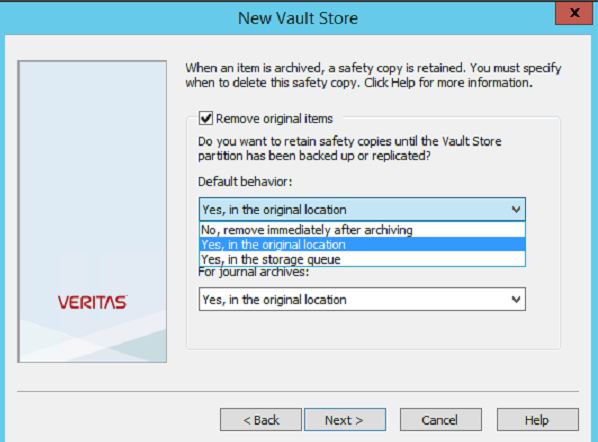
you will be asked, about safety copy, select the Yes, in the original location.(obviously it depends on your design, but here it is a lab).
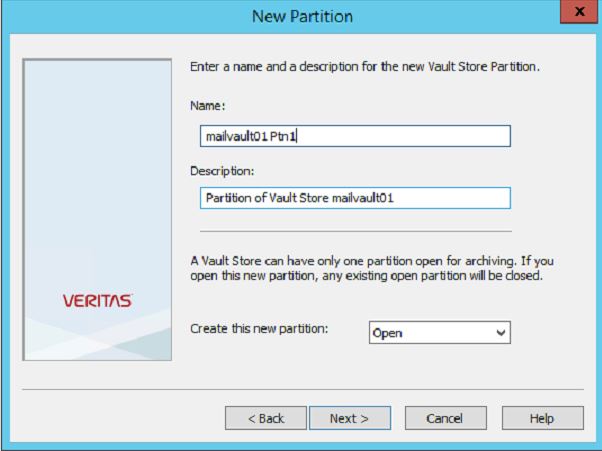
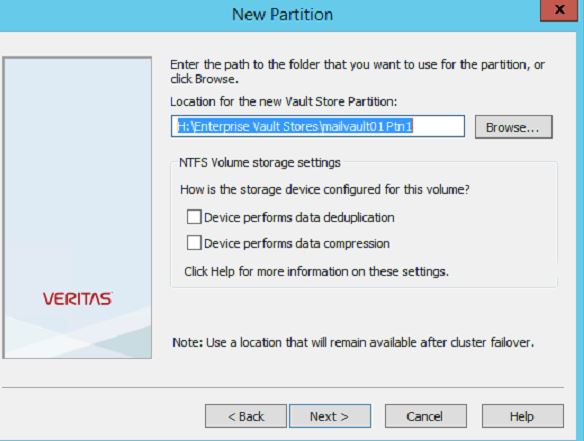
click next and then next on next window.on the new partition window, type a name for partition and click next
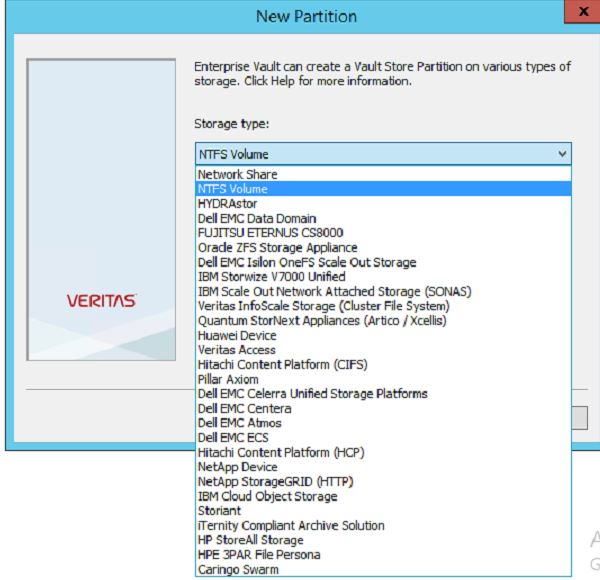
on storage type, select NTFS volume(if you have a specific storage which does the dedup and compress and it is mentioned in the list select it)
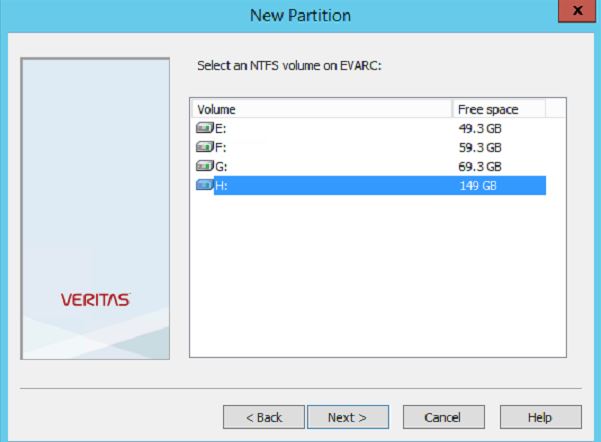
on the next window, select the disk which you have designated for vault partition and click next
confirm the path and put the check mark if your storage does the dedup and compression, for me the storage does not do that so I keep them unselected. (Nutanix does the dedup and compression, but I have not enabled them on the container level).
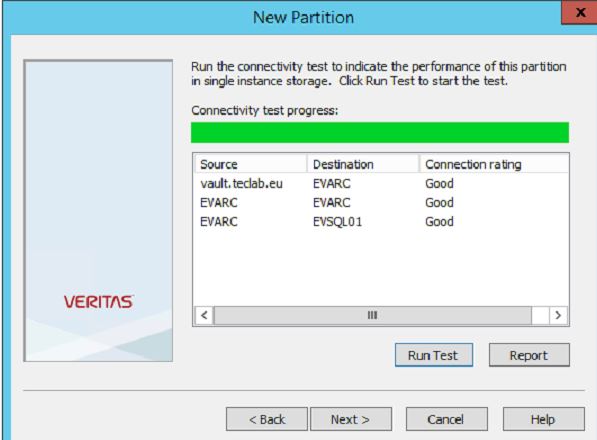
click next and confirm there is no issue with connectivity rating. click next
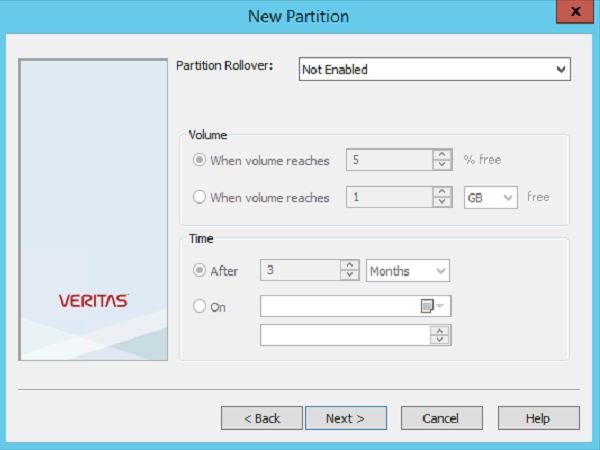
on partition rollover select not enabled. and click next
on next window, select the “Create Vault Store Partition with Security ACLs and click next
one next windows, select the use the “check for a trigger file” (we are using the snapshot for backup) and click on next

on select the file collection software, select None, and click Next, and then click on Finish.

that’s it! we have installed the EV on our primary node and configured it (basic settings).
Now you need to install the binary on other nodes (if you haven’t done yet) and start the Enterprise configuration wizard on each node.
on the first page select the second option and click next,
select the role which is configured on cluster and click next, you will be asked to provide EV service account.click next and finish.
that’s it!
In this article we have done the complete EV installation on a windows cluster.
I will try to provide all configuration parts related to EV administration in next articles.
Ahmad
